 Checking-Out DevicesChecking-Out Devices
To check-out a device with new data, simply cradle the device, make sure it is connected via active sync, and click the check-out button. If the device is not recognized as a registered device or is already checked out, you will not be able to check it out and must first register the device or check it back in. The check-out wizard will guide you through sending the data you need to the device.
This section covers the following topics:
Setting the Count Transaction's Quantities Per Book and Account Screen
Creating a Subset of the Item List Screen
![]()
The first screen of the check-out wizard lets the user select which transactions to prepare the device for. Preferences for checked transaction types they will be presented to the user on following wizard screens. Keep in mind that the data for a particular type of transaction is not checked out on the device, that type of transaction will be disabled when using Pocket Inventory. The following types of transactions are available:
Sales Orders
Purchase Orders
Shipping
Receiving
Inventory Count
Transfer *
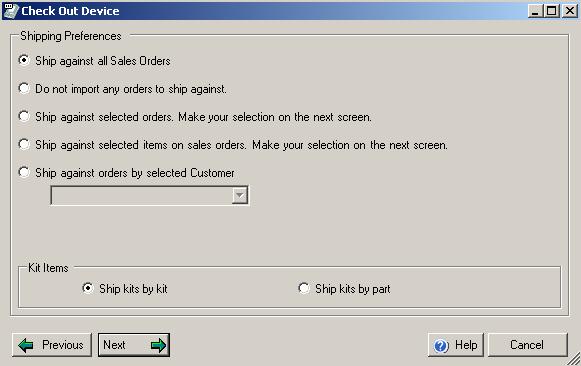
If the user selects to prepare the device for shipping, the Shipping Preferences screen will become enabled on the wizard. The user can select which sales orders to transfer to the device to ship against. Sales orders transferred to the device will be "checked out" and cannot be checked out by another device. The following options will be available:
Ship against all sales orders
Transfers all open sales orders and the items on the sales orders that have not been completely shipped. *This option will not be available if there are open sales orders with multiple ship dates.
Do not import any orders to ship against
This option is when you want to ship without a related Sales Order. NOTE: You can do this even if you select the other options.
Ship against selected orders
If the user selects this option then clicks 'Next', a screen will appear with a list of open sales orders. The user can then select which sales orders to transfer to the device to ship against.
Ship against selected items
If the user selects this option then clicks 'Next', a screen will appear with a list of items on open sales orders. The user can then select which items to transfer to the device, along with the item's sales order, to ship against. This is useful if there are open orders for which you want to ship only selected items.
Ship against orders by customer
Transfers all open sales orders for the selected customer and the items on the sales orders that have not been completely shipped. *This option will not be available if there are open sales orders for the customer with multiple ship dates.
Small Business Accounting and QuickBooks Users:
You will also be able to select how kits that are on open sales orders being sent to the device will be represented. If By Kit is selected, the parent item will be available to ship on the device. If By Part is selected, the components that make up the kit will be available to ship on the device. Keep in mind that components must be shipped in the proper amounts as are defined in the Kit.
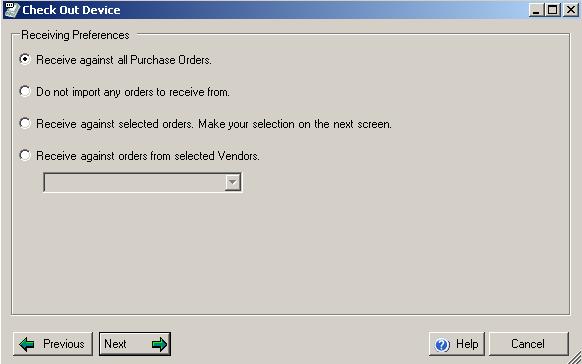
If the user selects to prepare the device for receiving, the Receiving Preferences screen will become enabled on the wizard. The user can select which purchase orders to transfer to the device to receive from. All orders transferred to the device will be checked out and cannot be checked out by another device. The following options will be available:
Receive against all purchase orders
Transfers all open purchase orders and the items on the purchase orders that have not been completely received. This option will not be available if there are open purchase orders with multiple ship dates.
Do not import any orders to receive from
Create Receivers without related Purchase Orders.
Receive against selected orders
If the user selects this option then clicks Next, a screen will appear with a list of open purchase orders. The user can then select which purchase orders to transfer to the device to receive against.
Receive against orders by vendor
Transfers all open purchase orders for the selected vendor and the items on the purchase orders that have not been completely received. This option will not be available if there are open purchase orders for the vendor with multiple ship dates.
If the user selects to prepare the device for an inventory count, the Count Quantities Per Book / Current Quantity selection screen will be enabled on the wizard. An account must be specified for the inventory adjustment that will be created as a result of the ensuing Inventory Count.
All Orders Users:
Here the user can select where the item's that will be transferred's starting quantities for the count will come from.
Available Quantity
Set the item's quantities per book to the item's available quantity.
Quantity by Location *
Set the item's quantities per book to the item's quantity in the selected location. A quantity " as of " date must also be entered representing the date that the inventory adjustment for the specified location that will be created as a result of the ensuing Inventory Count.
Small Business Accounting and QuickBooks users:
Here the user must select a date from which the current on hand quantities for the items to be counted will be pulled from.
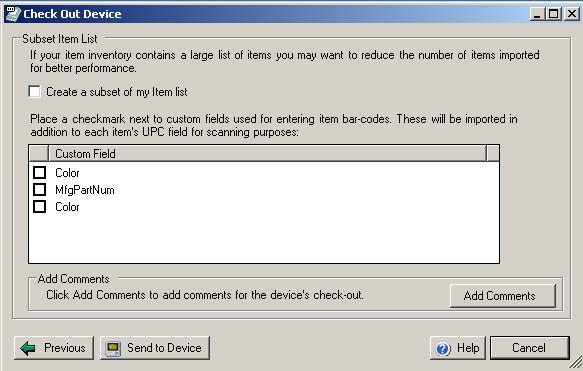
If you have a large item list in your back-end you can create a subset of your items for transfer to the device. Depending on the transactions that you have selected to prepare the device for, different options will be available for creating the subset of your items.
All Orders Users:
For All Transactions except Inventory Count by Location:
Once the create subset option is checked, the user can create a larger subset by selecting a location. All items with quantities in the selected location will be added to the transferred list of items.
For an Inventory Count by Location
Once the create subset option is checked no additional options will be presented to the user.
Depending on the transactions that the device will be prepared for and the options the user selects, the following items will makeup the transferred subset. This does not include item's that can be added with the location/bin options listed above.
Shipping/Receiving
All item's on sales orders and purchase orders that are being transferred will be added to the subset.
Count
If quantities are selected by location all item's in that location will be added to the subset. If no location is selected, all items will already be added.
QuickBooks/Small Business Accounting Users:
If the device is not being prepared for performing an Inventory Count the option to create a subset will be available and only items that exist on the orders being imported will be imported into Pocket Inventory. Leave this option unchecked to send all the inventory items in the item list to Pocket Inventory.
Once the wizard is complete the Transfer Data screen will appear. The Send to Device button will become enabled. Click it to send the data to the device. Keep in mind the transfer of data may take a few minutes, depending on the amount of data being transferred. Once the transfer is complete, the device is ready for use!
*Applicable to All Orders users only.