QuickBooks Inventory Software
Other Resources
A style is a grouping of items that have virtually the same characteristics but differ by their attributes. For example a shirt can come in different sizes and colors. Managing styles create a big headache for many companies. The problem is managing the items within the style. For example say you have a style with 5 sizes and 4 colors and you need to keep track of each item separately. That means that you would need to create 20 virtually identical items. If you need to change the description, price or cost of these item you would need again to edit all 20 items. All Orders solves this problem with the 'Style Manager'. Using the style manager you can manage the style and all items that are part of the style using a single screen.
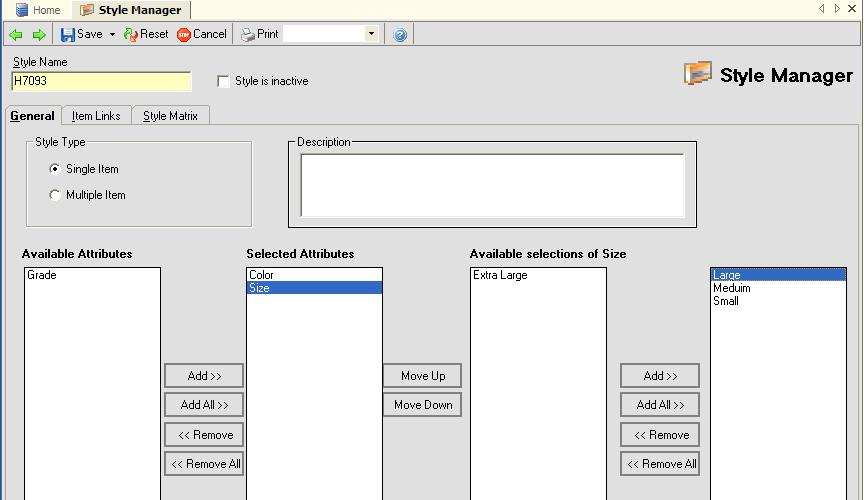
Before you start creating styles, you will need to create one or more attributes as wells as the selections within the attributes. An attribute is something like 'Color' or 'Size'. Blue, green and red are selections within the Color attribute. Small, medium and large are selections within the Size attribute. A style can have up to 5 attributes and an unlimited number of selections within the attributes.
To create a new style, click Sales --> New Style.
All Orders support two types of styles.
Single Item: A single item style is used when you do not want to create a separate item on the list for each variation. You would use this when you do not need to track then quantity of each individual item in inventory but still need to determine the different characteristics at order time or each variation has different prices and cost. Under this scenario, on a transaction (PO, SO) a single item on the item list along with the attributes and selections are used.
Multiple Item: A multiple item style is used when you need to track the quantity of each variation.
First enter a unique name of number for the style and optionally enter a description. Then select either the Single Item or Multiple Item type.
Next you need to add attributes and selections. Remember that your attribute selection will include all possible variations so that you can include in the style what you need. For example one style may have red, blue and yellow as colors whereas another may have red, green and black. Therefore when selections for Color, you need to list red, blue, yellow, green and black.
On the first box from your left, you will see the available attributes, highlight one of them then click the Add >> button. That attribute will by transferred to the second box from your left 'Selected Attributes' and its selections will show on the third box from your left 'Available Selections'. Highlight one of the selections and again click Add >>. Repeat until you have added your attributes and selections.
The order of your attributes is important and should represent a logic flow of how you view your items. For example colors would logically come BEFORE size. You can reorder the attributes using the Move Up and Move Down buttons.
Note: Once you save the style you cannot change the attributes nor can you change the style types. You can however add or delete selections.
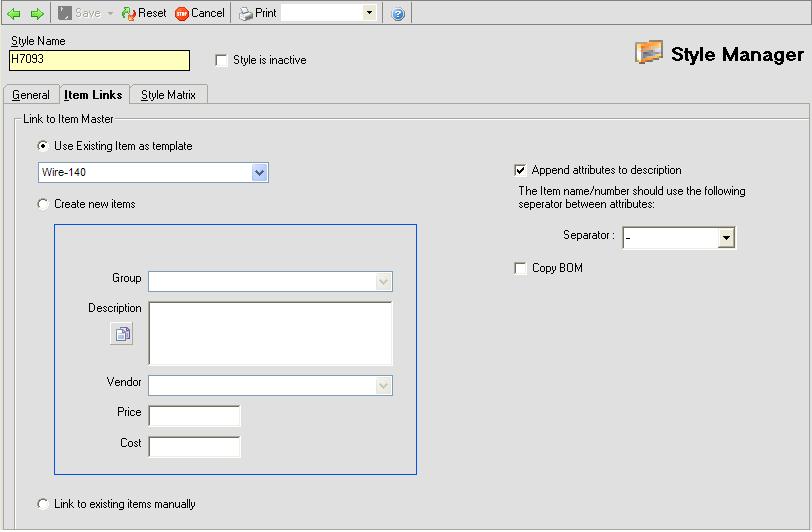
The next step is to click the Item Link tab. If you have selected the Single Item style type, then you will see a single drop down box where you can select the EXISTING item to associate with this style which you should now go ahead and pick. If you selected Multiple Item style type then you will see three options:
Use existing item as template: Select this option when you want to use an existing item for all the items in the style. The additional items so created will use the templates group, account, UOM etc.
Create new items: Select this option when you want to create brand new items for the style.
Link to existing manually: Select this option when you want to associate existing items to the style variations.
If you pick either of the first two options you will have additional options to tell All Orders how to create or update your items.
Append attributes to description: If this is selected the item description will include the attribute and selection date (e.g. [your description] Color Blue Size Large)
Item name separator: When creating or editing items, All Orders will concatenate the style name and the attribute selections using the separator to derive the item name. For example if you select '-' as the separate your item name may look like H7093-BL-L.
Copy BOM: (first option only) will instruct All Orders to copy the bill of materials from the template to the new items.
If you are creating new items, you must select a group that will be used for the new items. You should also complete the description, vendor, price and cost.
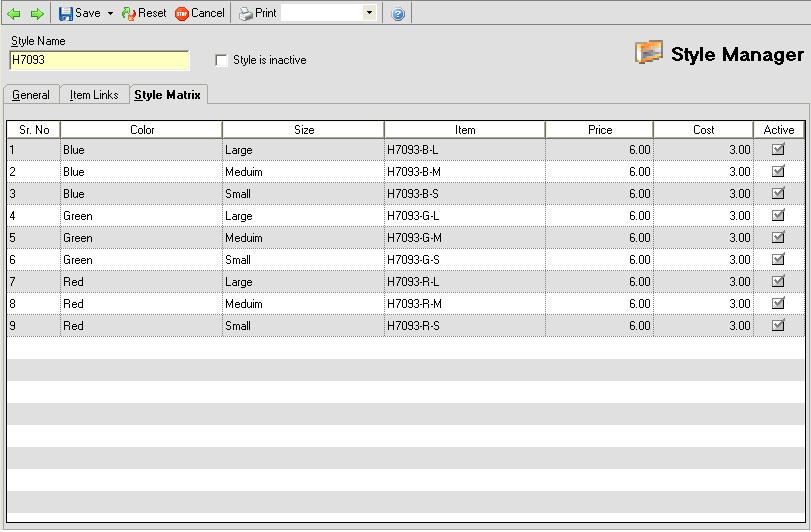
The final step is to click the Style Matrix tab, note that the Save button will be disable until you do so. On the grid you can view all the items in the style. You can edit the cost and price on the grid.
Once finished, click Save, Save & New or Save & Close. If necessary, All Orders will create or modify your items.
Open the Style List from the list menu to view and edit your styles.